Overview
In the Q&B system you can import new or updated information (data, files) for the following modules:
- Entities
- Users
- Clients
- ClientAddresses
- Addresses
- Currency
- Products
- Schemas
- Workflows
- Document Templates
- Quotes
- MultiSections
- EndorsementLibraries
- Endorsements
Import Data
Firstly, to make the import work, the importable file structure must be exactly the same as the structure in our database. Therefore, we strongly recommend you to firstly export the structure for the required module, and only then fill in the data.
The same is with files. Schema/workflow files must be in the .json format and gathered into the one .zip file. Document templates should be in the .docx or. pdf format. Additionally, you must create data.xlsx file where you will fill in the info about the schema/workflow/document template, otherwise the system will not understand what to do with it.
Everything has to be compressed into a one .zip file and files must be gathered into another folder:

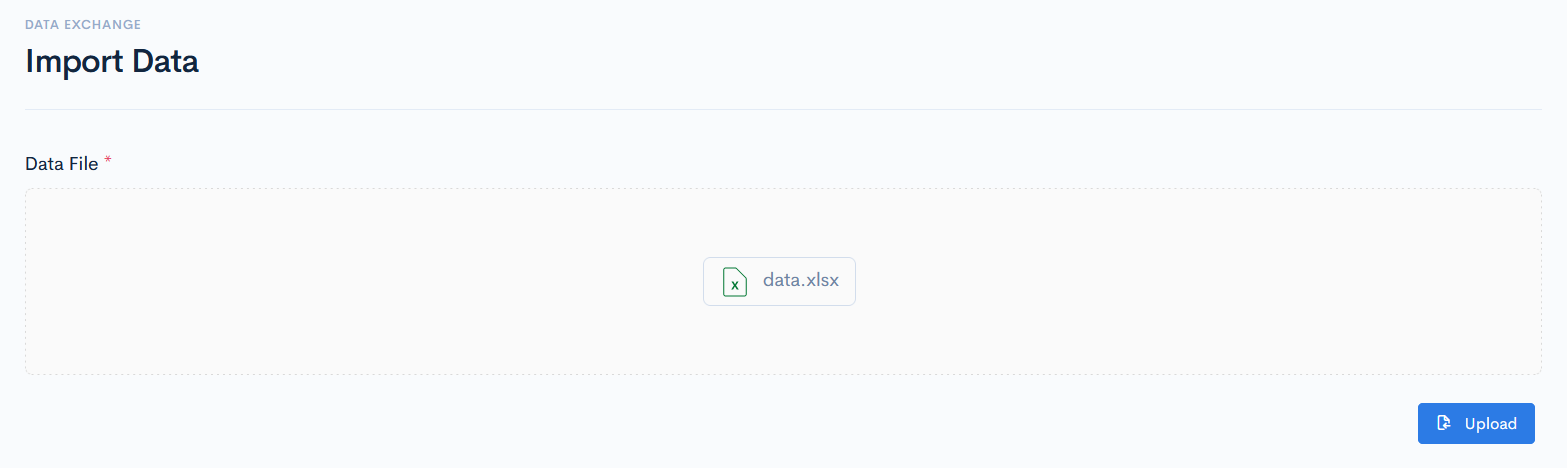
Example of the data file, when a document template is being uploaded:

{info.fa-info-circle} In general, you will not need to create schema/workflow with its data file from scratch. What you really will be doing, is exporting schema/template from the testing instance and importing it again to yours. The information mentioned above is for general reference.
To import something, drag the file to the upload area and click Upload.
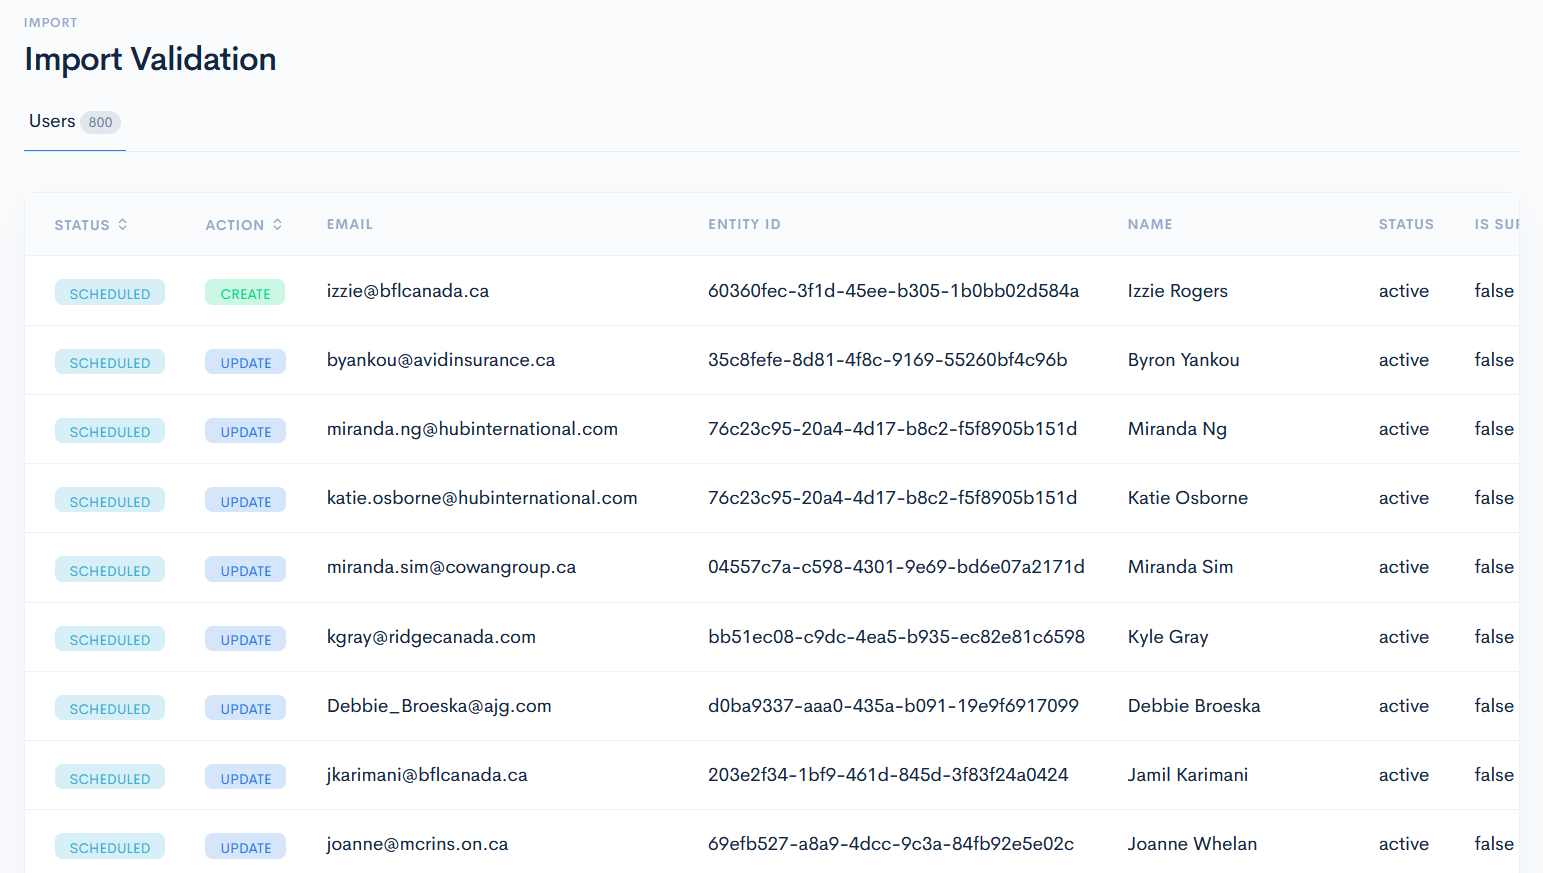
For example, we imported the user data. The Import Validation window will appear with the Users tab. If we would import several modules, then more tabs will appear. The number next to the name shows how many data lines are imported.
This window does not mean, that the import is completed, it only lets you to see if everything is okay and there are no errors. Every data line, that is ready to be imported, has the Scheduled status. If the user already exists, and its info was only changed, then the action is Update. If the user is new for the system, action is Create. Click the Import button to start importing. If you need to cancel the process and upload another file, then click Upload New File.
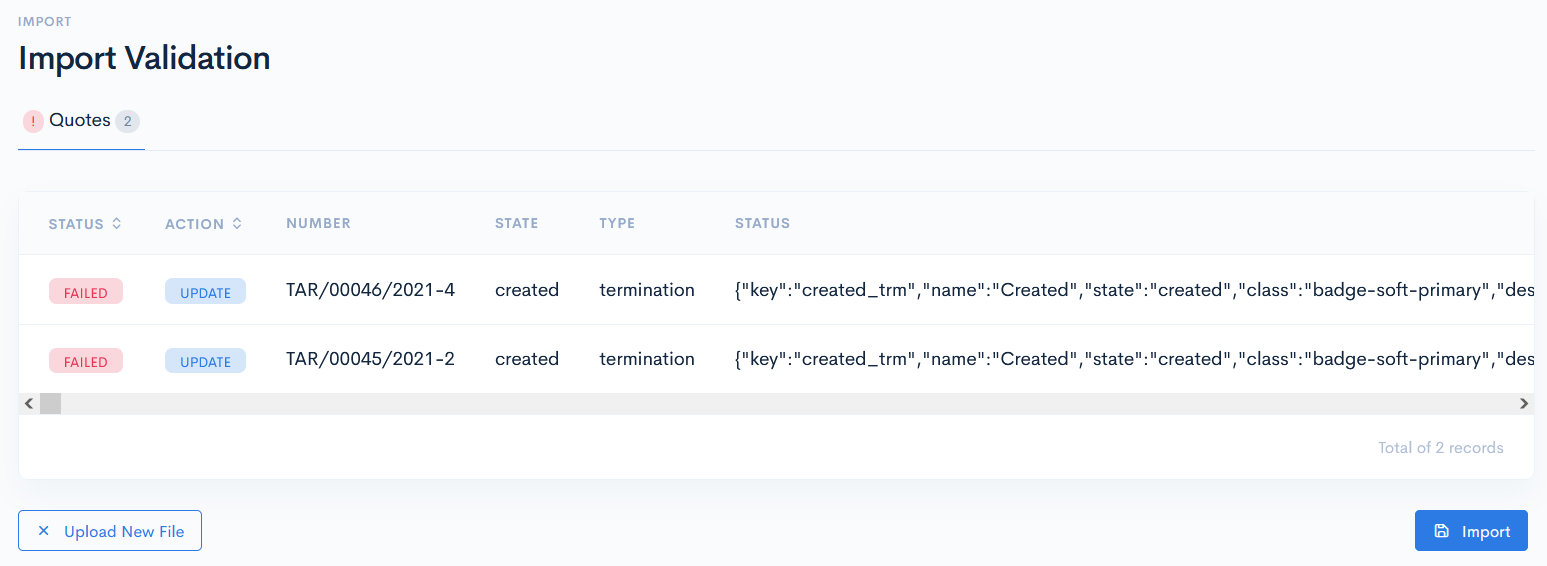
If there is an error, then data field status is Failed:
After the import, a new user will appear:

Import Data Structure
In this section we are going to explain which data columns has to be filled in the .xlsx file and what do they mean.
Entity
| Column Name | Required | Description |
| Code | Yes | This code maps user with the entity. In the Q&B system it is called as Reference. |
| Name | Yes | The entity name always must be unique. Note: The system looks for the code and name match, and if there is no such, then a new entity is created. |
| Type | Yes | Enter Coverholder, Insurer or Agent. |
| Network | No | Enter the network name. |
| Legal_name | No | Enter entity legal name. |
| Address_XXX | No | Enter address details. |
| Phone | No | Enter phone number. |
| Website | No | Enter website name. |
| Notes | No | Enter some notes. |
| Status | Yes | Active or Inactive. |
| Toba_start_date | No | Date in the YYYY-MM-DD format. |
| Toba_end_date | No | Date in the YYYY-MM-DD format. |
| Payment_term_id | No | Enter 15 days, 30 days, 45 days, or instant. |
| Bank_details | No | Enter bank account details. |
| Is_group | Yes | Is the entity a parent or not. Acceptable values: True or False. |
| Parent_entity_code | No | Enter a parent entity code to which the child entity belongs. |
| Is_making_payments | No | Acceptable values: True or False. |
| Remote_folder | No | Enter remote folder name. |
Users
| Column Name | Required | Description |
| Yes | The email must be unique. | |
| Entity_code | Yes | Map user with an entity (enter the entity reference number). |
| Name | Yes | Enter a name. |
| Status | Yes | Enter Active or Inactive. |
| Is_supervisor | Yes | Enter True or False. |
| Tfa_enabled | Yes | Is the two-factor authentication required or not. |
| Language | Yes | Enter the language code. Language code can be looked up in the Translation Library module. |
| Phone | No | Enter phone number. |
| Mobile | No | Enter phone number. |
| Address_XXX | No | Enter address details. |
| Notes | No | Enter some notes. |
| User_roles | No | Assign a role. |
Clients
| Column Name | Required | Description |
| Code | Yes | Enter a unique code. If not entered, the system will generate its own. |
| Name | Yes | Enter a name. |
| Legal_name | Yes | Enter a legal name. |
| First_name | No | Enter a fist name. |
| Last_name | No | Enter a last name. |
| Company_registration_code | No | Enter company code (any string). |
| Company_tax_code | No | Enter company tax code (any string). |
| Active | Yes | Enter True or False. According to this, the system will pick the custom status. For more information see the Clients chapter. |
| Type | Yes | Enter Corporate or Individual. |
| No | Enter an email. | |
| Phone | No | Enter phone number. |
| Website | No | Enter website. |
| Account_manager_id | No | User name, who is in charge of this client. |
| Language | No | Enter the language name. |
| Occupation_code | No | Enter the client occupation. |
| Remote_folder | No | Remote folder name, where the documents are stored. |
| Entity_code | Yes | Map client with an entity (enter the entity reference number). |
| Building through post_code | No | Enter client address details. Note: If you have more than one address, they should be entered to the Addresses data module. |
| Types | No | If you enter the address, then you must specify which type of the address this is. Possible values: Legal, Office, Work, Postal or Home. |
| Notes | No | Enter some notes. |
Addresses
| Column Name | Required | Description |
| Client_id | Yes | Client code, that has more than one address. |
| Building through post_code | No | Enter client address details. |
| Types | No | Specify which type of the address this is. Possible values: Legal, Office, Work, Postal or Home. |
Currency
| Column Name | Required | Description |
| Code | Yes | Unique currency code. Currency codes can be looked up here. |
| Name | Yes | Currency name. |
| Symbol | No | Currency symbol. |
| Is_active | Yes | Will this currency be available or not. Enter True or False. |
| Is_primary | Yes | Will this currency be primary or not. Enter True or False. |
Product
| Column Name | Required | Description |
| Name | Yes | Product name. |
| Tag | Yes | Used when mapping a child product to a parent. |
| Commission | Yes | Currency symbol. |
| Description | No | Enter product description. |
| Parent_tag | No | If the product is a child, then define the parent tag, to which the child belongs to. |
Quotes
| Column Name | Required | Description |
| Number | Yes | Enter quote number. |
| Type | Yes | Enter one of the possible quote types: New, Adjustment, Termination, Renewal. |
| Status | Yes | If this is a new quote, then enter Bound. The system will fill in the rest of the workflow, by the specified schema_reference. |
| Agent_id | No | Enter responsible entity code. |
| Binder_id | No | Enter binder tag, to map it to the quote. |
| Creator_id | Yes | Enter the user name, who created the quote. |
| Client | No | Client name. |
| Client_code | No | Client code. |
| Client_tax_id | No | Enter company tax code (any string). |
| Object | No | Insurance object (to be entered as a string array). |
| Code | No | Used currency code in the quote. |
| Valid_date through Termination_date | Yes | Enter date in the YYYY-MM-DD format. |
| Is_renewable | Yes | Will the quote be renewable or not. Enter True or False. |
| Version | Yes | Enter the quote version number. |
| Policy_number | No | |
| Broker_id | No | Enter the user name, which belongs to the broker. |
| Underwriter_id | No | Enter the user name, which belongs to the broker. |
| Renewed_number | No | If the quote was renewed, enter its number. |
| Renewed_version | No | How many times the quote was renewed. |
| Effective_date | Yes | Enter date in the YYYY-MM-DD format. |
| Remote_folder | No | Remote folder name, where the documents are stored. |
| Data.XXX.XXX | No | All the custom fields/sections/etc. have to start with the data keyword. Every quote element must defined in this format. Note: Entering multisections is not allowed. |
Endorsement Libraries
| Column Name | Required | Description |
| Name | Yes | Library name. |
| Tag | Yes | Unique identifier of a library, which is used for value mapping in the API Integrations. |
| Description | No | Enter library description. |
| Status | Yes | What is the status of the library. Possible options:
|
| Data | No | |
| Product_tag | Yes | Map the library to the specific product by using its tag. |
Endorsements
| Column Name | Required | Description |
| Name | Yes | Endorsement name. |
| Tag | Yes | Unique identifier, which is used for mapping in the API Integrations. |
| Extra_premium | No | Enter extra premium amount. |
| Extra_premium_currency_code | Yes | In which currency extra premium will be shown. Enter the currency code. |
| Limit | No | Enter the limit amount. |
| Limit_currency_code | Yes | In which currency limit will be shown. Enter the currency code. |
| Deductible | No | Enter the deductible amount. |
| Deductible_currency_code | Yes | In which currency deductible will be shown. Enter the currency code. |
| Description | Yes | In which currency deductible will be shown. Enter the currency code. |
| Show_description | Yes | Will the description be shown in the UI. Enter TRUE or FALSE. |
| Library_tag | Yes | Map the endorsement to the specific library by using its tag. |
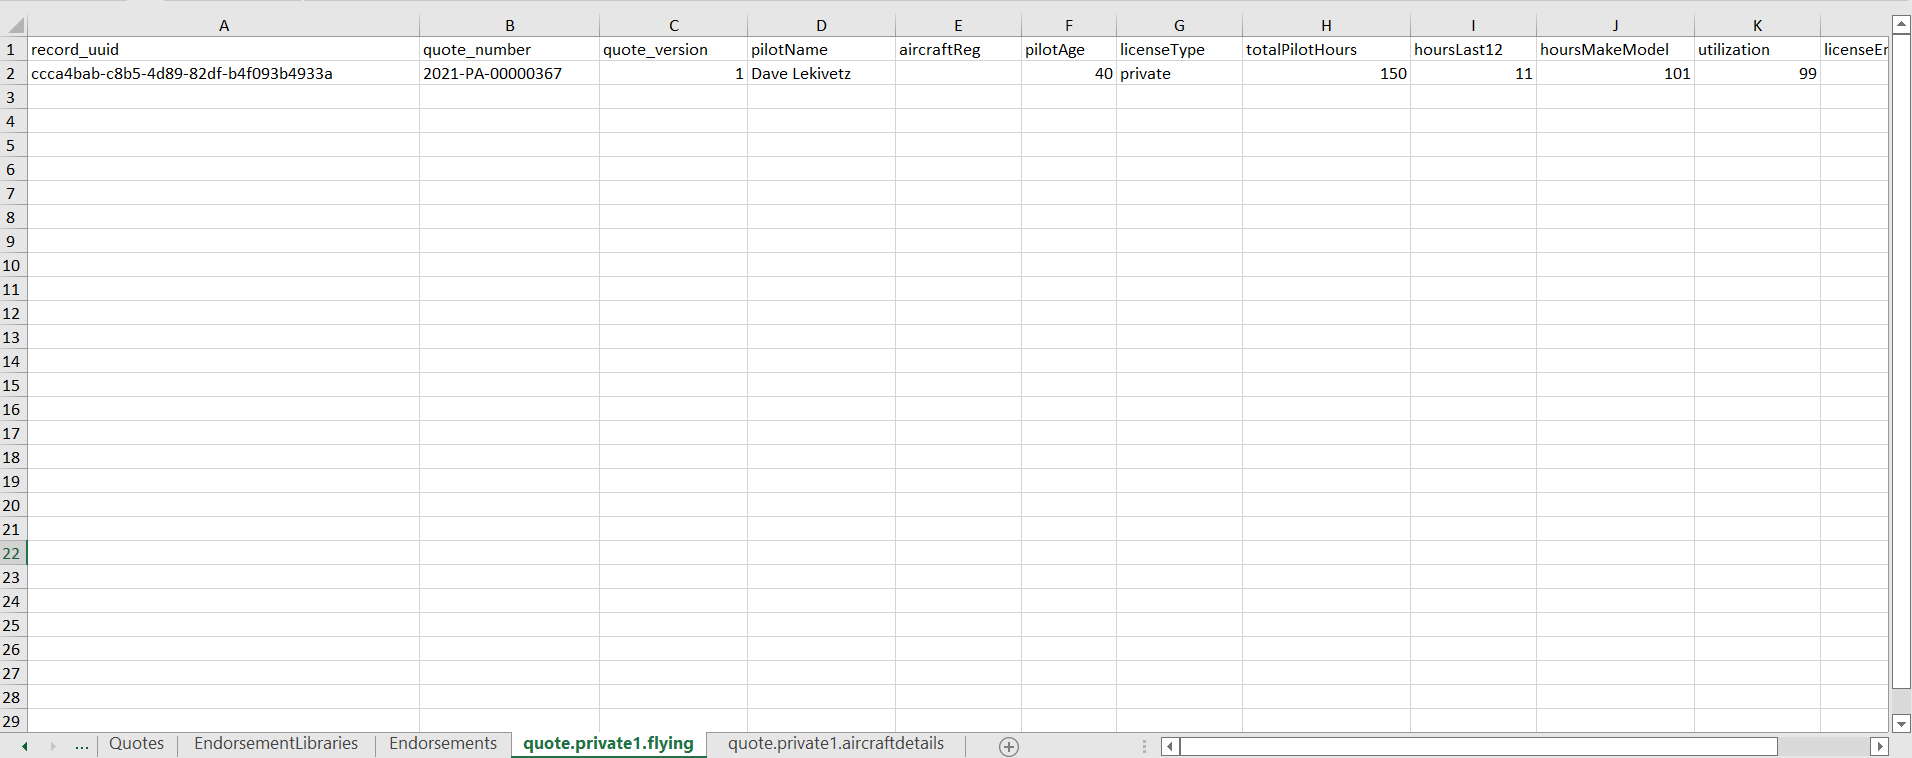
Multisections
Multisections are created in separate tabs of the .xlsx file sheet, the tab is named as following:
quote.{schema_tag}.{multi_section_key}
Where:
schema_tag will be replaced with the actual schema tag.
multi_section_key will be replaced with the multisection key name (the JSON file name, where the multisection is created) from that quote, e.g. quote.private1.flying. This key name can be looked up in the relevant schema.
In the multisection sheet the first three columns are the following:
- record_uuid - multisection uuid., not mandatory
- quote_number
- quote_version
Next columns are the key names of the quote multisection fields.